Tuesday, 12 February 2013
Project Inspirations: Muslin Gift Bags
This is a great project for housewarming gifts, a sachet for your dresser, or small jewellery. For only $3.95 you will receive 3 muslin bags.
I can't wait to create mine!!!
Enjoy,
Jennifer
Friday, 8 February 2013
Umped up For Always
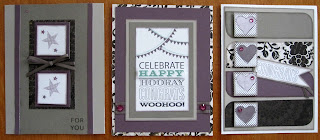
Ok, so as promised, this is the "umped up" version of For Always WOTG.
Same designs, same papers, umped up. I did not add anything that was not in the kit. Any extra matting was with left over papers.
Card #1 - I added the smokey plum mat behind the two white squares, changed both squares to stars, added a small strip of smokey plum to to centre the slate cardstock and stamped "for you" at the bottom right. Stamp set from the WOTG but masked to only have "for you" showing.
Card #2 - I added the background & texture paper behind the smokey plum, did not do the stitching around the cardstock, and changed the colours of the ink to highlight juniper.
Card #3 - I added the whisper cardstock as a mat behind the 4 rectangular shapes, which were cut about 1/8" smaller - changed the hearts to first and second generation smokey plum, added the heart dot outline, and changed to a banner with Congrats on using the masking technique. All the pieces again were ink distressed with whisper.
The WOTG are so versatile, it's easy to add your own personality, to "ump up" your cards.
Jennifer
Sunday, 3 February 2013
Time Can't Stand Still, but You Can!
Does this give you enough inspiration to scrapbook?
This beautiful video was presented at Close to My Heart 2012 Convention by the lovely, talented and amazing Stacy Julian. Believe me when I say there wasn't a dry eye in the house.
I think it made all of us realize why we scrapbook, why we teach paper crafting, and why we are so passionate about Close to My Heart. It isn't about paper, bling,or ribbon - it's about celebrating those little moments that become the big moments, cherishing friendships with fellow consultants that you only get to see once a year, celebrating everyone's successes and the joy of preserving those memories on paper for others to smile, cry, or laugh when they remember.
Enjoy,
Jennifer
Saturday, 2 February 2013
Love Always With a Twist
As promised, I completed the same three cards as my previous post from the Love Always WOTG card kit. I didn't change the colours, or the design layout, but I did ink the edges of all the paper and card bases to add some visual interest. I used whisper ink and a trusty sponge dobber to add the ink distressing. A super simple but effective technique.
I flipped the background & texture paper on the first two cards, added a bow to the heart instead of the ribbon tags and moved the bling to the left sides of the hearts on the third card.

I flipped the background & texture paper on the first two cards, added a bow to the heart instead of the ribbon tags and moved the bling to the left sides of the hearts on the third card.

I've posted the originals below so you can compare. Sorry I didn't keep the cards in the same order in my photos.
See how just a little bit can add some ump, some pizzaz to your projects.
Stay tuned, not done yet, I'll bump it up a bit more on the next round to show you how you can add your own , but still using only the items given in the WOTG, not adding anything that isn't in the kit, to give you even more options.
Enjoy!
Jennifer
Subscribe to:
Comments (Atom)
Happy Holidays - - Let's Look at 2024
Happy Holidays!!! I hope everyone is enjoying this festive time of year, full of love, laughter and making memories. I love to take the tim...
.jpg)
-
Happy Holidays!!! I hope everyone is enjoying this festive time of year, full of love, laughter and making memories. I love to take the tim...
-
Although I am an independent consultant with Close to My Heart, I do follow blogs and you tube channels of demonstrators with other direct s...
-
This weekend we are having a very special RELEASE RECAP EVENT !! In case you missed it, our most recent release featured FOUR bran...


.jpg)

